How to take a screenshot on your Mac
By
Screenshot on a Mac
Table of Contents
Use Shift-Command-5 in macOS Mojave
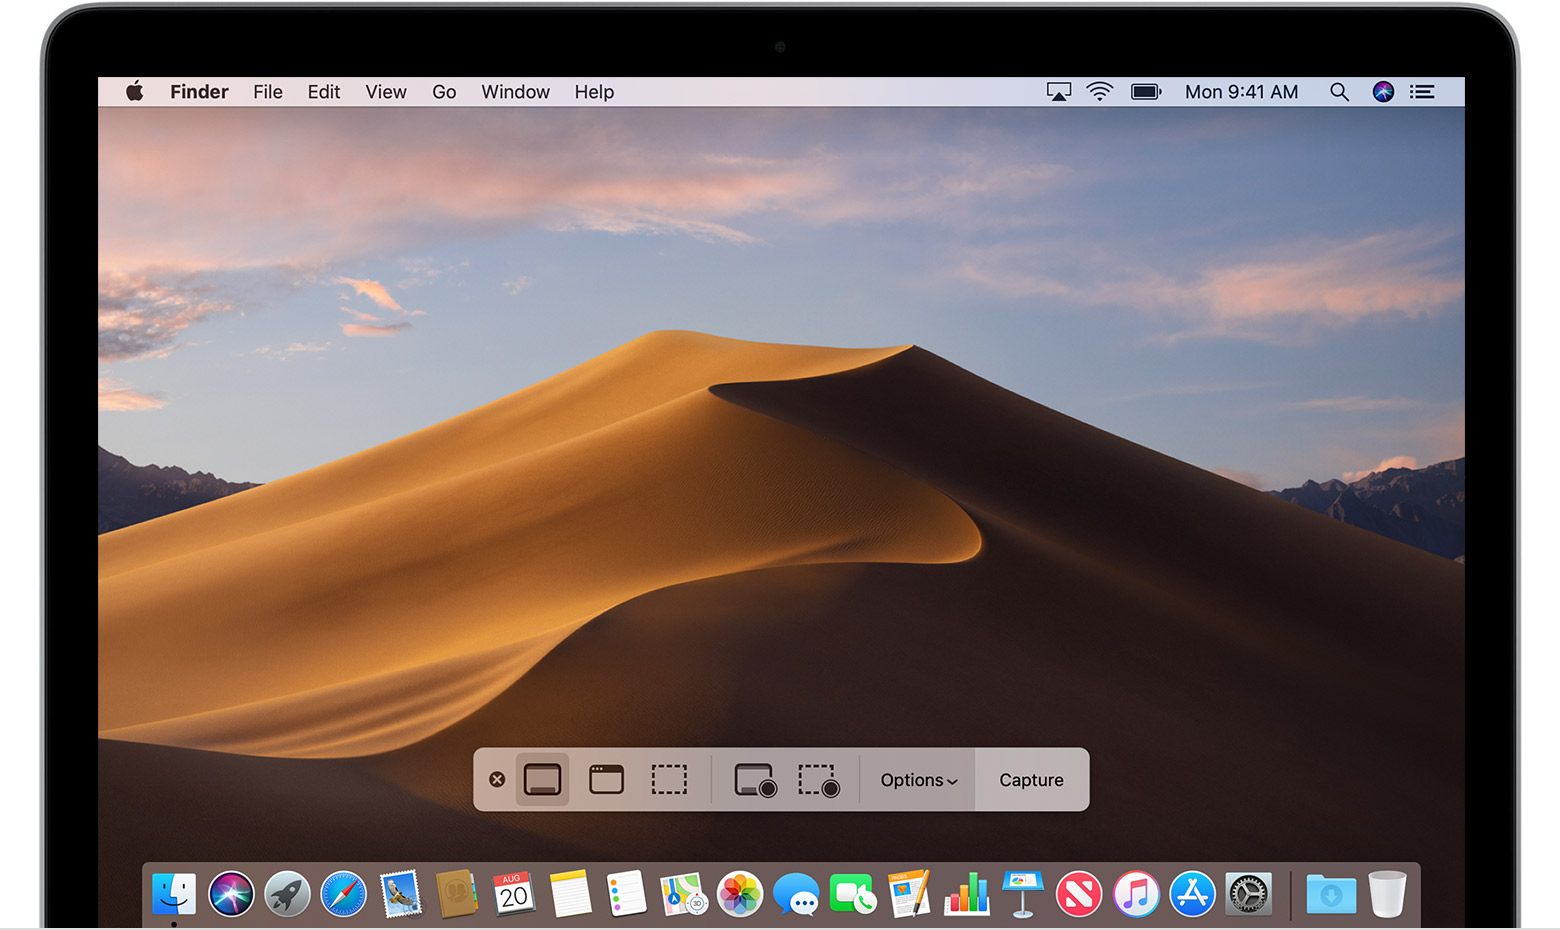
With macOS Mojave, press Shift-Command (⌘)-5 on your keyboard to see all the controls you need to capture still images and record video of your screen. Use these onscreen controls to select whether to capture the entire screen, capture a window, capture a selected portion, or record a video of the screen. (To capture the Touch Bar, continue to use Shift-Command-6.)
Capture the entire screen
- Click
 in the onscreen controls. Your pointer changes to a camera
  .
. - Click any screen to capture that screen, or click Capture in the onscreen controls.
- Use the thumbnail to markup, share, save, or take other actions.
Capture a window
- Click
 in the onscreen controls. Your pointer changes to a camera .
 - Click a window to capture that window.
To exclude the window’s shadow from the screenshot, press and hold the Option (⌥) key while you click.
- Use the thumbnail to markup, share, save, or take other actions.
Capture a selected portion of the screen
- Click
 in the onscreen controls.
 - Drag to select an area of the screen to capture. To move the entire selection, drag from within the selection.
- Click Capture in the onscreen controls.
- Use the thumbnail to markup, share, save, or take other actions.
Markup, share, and save
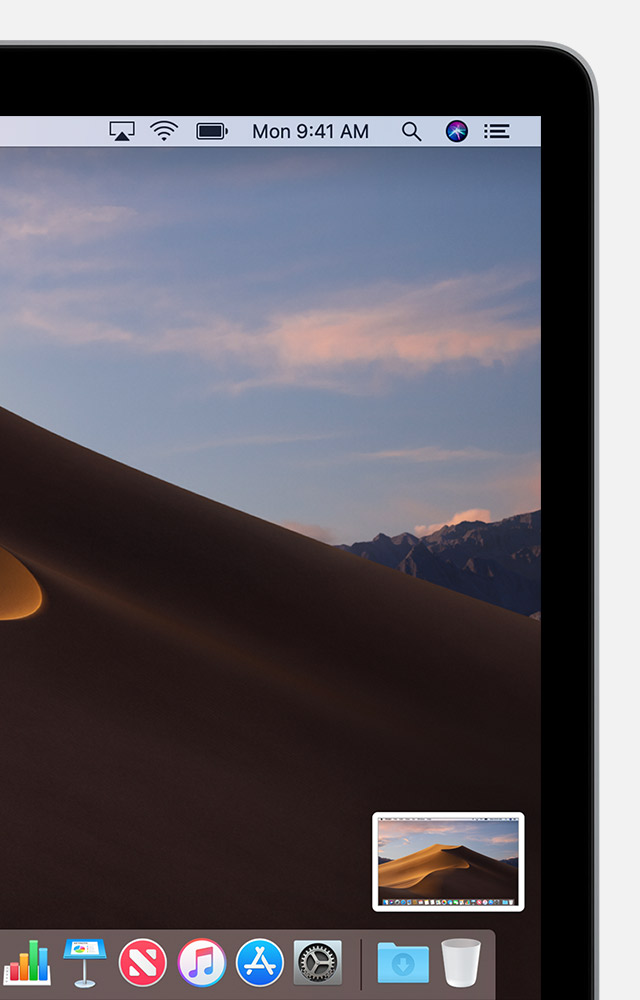
After you take a screenshot, a thumbnail of the screenshot appears briefly in the lower-right corner of your screen.
- Take no action or swipe the thumbnail to the right and the screenshot is automatically saved.
- Click the thumbnail to open the screenshot. You can then edit it using the markup tools in the toolbar, or click
 to share it.
 - Drag the thumbnail to move the screenshot to another location, such as to a document, an email, a Finder window, or the Trash.
- Control-click the thumbnail for more options. For example, you can change the save location, open the screenshot in an app, or delete the screenshot without saving it.
![]()
Change the settings
Click Options in the onscreen controls to change these settings:
- Save to: Choose where your screenshots are automatically saved, such as Desktop, Documents, or Clipboard.
- Timer: Choose when to take the screenshot: immediately, 5 seconds, or 10 seconds after you click to capture.
- Show Floating Thumbnail: Choose whether to show the thumbnail.
- Remember Last Selection: Choose whether to default to the selections you made the last time you used this tool.
- Show Mouse Pointer: Choose whether to show the mouse pointer in your screenshot.

Or use other screenshot shortcuts
You don’t need macOS Mojave to use these shortcuts, though they work in Mojave as well.
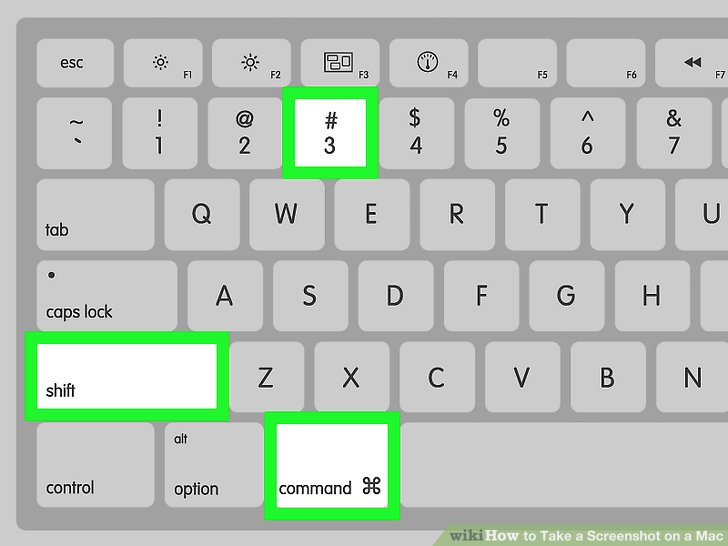
Capture the entire screen
Press Shift-Command-3, then find the screenshot as a .png file on your desktop.
Capture a window
- Press Shift-Command-4.
- Press the Space bar. The pointer changes to a camera .
- Click a window to capture that window.
To exclude the window’s shadow from the screenshot, press and hold the Option (⌥) key while you click. - Find the screenshot as a .png file on your desktop.
Capture a selected portion of the screen
- Press Shift-Command-4.
- Drag to select the area of the screen to capture. To move the entire selection, press and hold Space bar while dragging.
- After you release your mouse or trackpad button, find the screenshot as a .png file on your desktop.
Capture a menu
- Click the menu to reveal its contents.
- Press Shift-Command-4.
- Drag to select the area of the menu to capture, then release your mouse or trackpad button to capture that area.
- Or press Space bar to change the pointer to a camera , then click the menu to capture it.
- Find the screenshot as a .png file on your desktop.
Capture the Touch Bar
If you have a Mac with a Touch Bar and macOS Sierra 10.12.2 or later, press Shift-Command-6 to capture what is currently displayed on the Touch Bar. Then find the screenshot as a .png file on your desktop.
You can also customize the Control Strip region of your Touch Bar to include a Screenshot button.
